
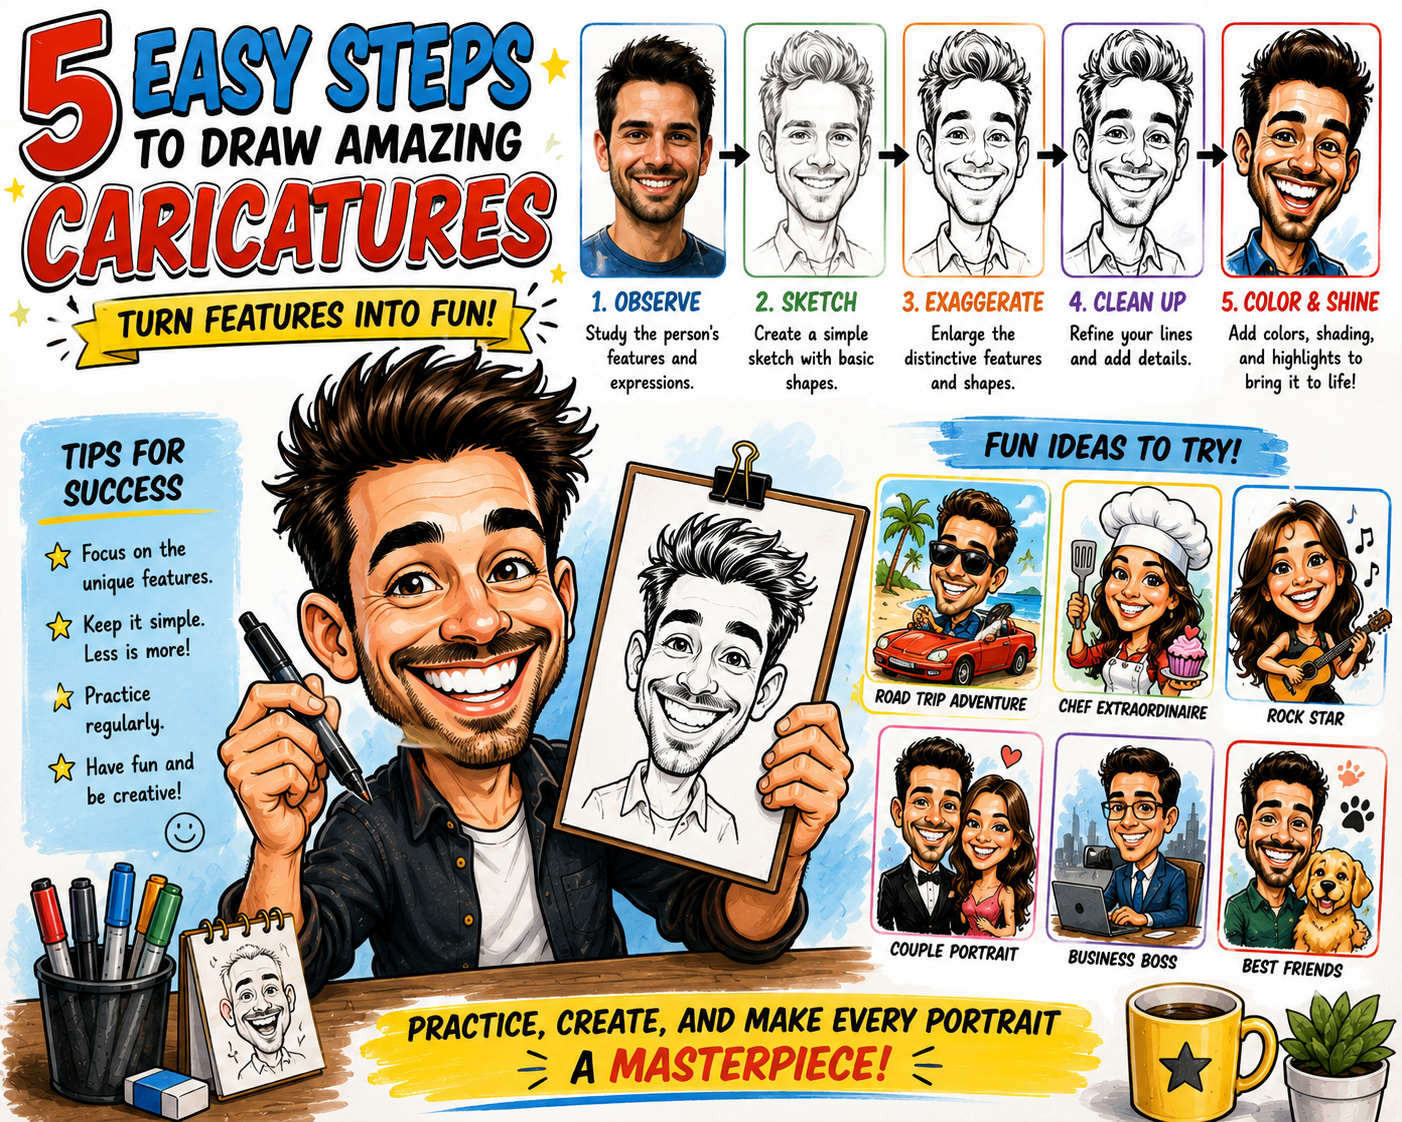
Turning a photo into a caricature is not simply a matter of making the eyes enormous or stretching the nose. The real challenge is exaggerating the person’s most distinctive features while keeping the face instantly recognizable.
A successful caricature should look humorous, lively, and creative, but it should still feel like the person in the photograph. This balance comes from careful observation, controlled exaggeration, and an understanding of how facial features relate to one another.
Whether you draw with a pencil, tablet, or digital illustration program, the following process can help you create a recognizable caricature from almost any clear portrait photo.
What Creates Likeness in a Caricature?
Likeness is created by more than individual facial features. It comes from the combination of head shape, spacing, proportions, expression, hairstyle, and small identifying details.
Two people may both have large eyes or wide smiles, but the distance between their features, the angle of their eyebrows, the shape of their cheeks, and the way they hold their head may be completely different.
Choose the Right Reference Photo
The quality of the reference photograph strongly affects the finished caricature. A clear, expressive image gives the artist more useful information than a dark, blurry, or heavily filtered picture.
A strong reference photo should have:
- Clear lighting across the face
- A sharp view of the eyes, nose, and mouth
- A natural facial expression
- Minimal distortion from camera filters
- A visible hairstyle and face outline
- A front or three-quarter angle
Whenever possible, use several photos of the same person. One image may show the hairstyle clearly, while another may capture the person’s natural smile or usual expression.
Step-by-Step: How to Turn a Photo Into a Caricature
Step 1: Study the Overall Head Shape
Before drawing individual features, look at the outside shape of the head. Decide whether the face is round, square, long, narrow, heart-shaped, triangular, or pear-shaped.
Observe the width of the forehead, fullness of the cheeks, shape of the jaw, and length of the chin. These large shapes are often more important to likeness than small details.
Sketch the head lightly using a simple geometric form. Avoid starting with the same oval for every person.
Step 2: Mark the Facial Guidelines
Draw a vertical centerline and horizontal guides for the eyes, nose, and mouth. These guidelines help maintain the natural relationship between the features.
Notice whether the eyes sit high or low on the face, whether the nose is long or short, and how much space appears between the mouth and chin.
The placement of these features can make a portrait recognizable even before detailed lines are added.
Step 3: Identify the Most Distinctive Features
Ask which features catch your attention first. These are usually the best candidates for exaggeration.
Distinctive features may include:
- A broad or crooked smile
- Large, narrow, or deeply set eyes
- A curved, pointed, wide, or short nose
- Rounded cheeks or a strong jaw
- Thick or sharply angled eyebrows
- A high forehead or low hairline
- Large glasses or unusual facial hair
- A memorable hairstyle
Write down the two or three strongest observations before you begin exaggerating.
Step 4: Create a Simple First Sketch
Draw the face with only basic shapes. Use circles, curves, boxes, and triangles to establish the overall design.
Keep the first sketch loose. Do not worry about eyelashes, wrinkles, hair strands, or clothing details yet.
At this stage, your goal is to test the head shape, expression, and spacing of the features.
Step 5: Exaggerate One Feature at a Time
Begin by changing the strongest feature slightly. Make the smile wider, the cheeks fuller, the nose longer, or the eyes larger.
Then compare the sketch with the photo. If the person remains recognizable, you can push the exaggeration a little further.
Avoid changing every feature at once. Too many exaggerated elements can compete with one another and weaken the likeness.
Step 6: Use Opposites to Strengthen the Design
Caricature artists often create contrast by making one feature large and another small. A large forehead may be paired with a smaller lower face. Full cheeks may be contrasted with a narrow chin.
If the eyes are enlarged, the nose or mouth may be simplified. If the hairstyle becomes very large, the body may be drawn smaller.
These contrasts make the caricature more dynamic without requiring every feature to be distorted.
Step 7: Preserve Important Spacing
The spaces between features are an important part of likeness. Notice how far apart the eyes are, where the nose sits in relation to the mouth, and how much space appears below the lower lip.
You can enlarge or reduce features while preserving these relationships. This helps the caricature remain believable and recognizable.
Step 8: Capture the Natural Expression
Expression is one of the strongest sources of personality. Study how the eyes, eyebrows, cheeks, and mouth work together.
A genuine smile often raises the cheeks and narrows the eyes. A surprised expression may lift the eyebrows and open the mouth. A confident expression may involve a slight head tilt or uneven smile.
Avoid replacing the person’s natural expression with a generic cartoon grin.
Step 9: Add Hair, Glasses, and Personal Details
Hairstyle, facial hair, glasses, earrings, hats, and other accessories can be essential to recognition.
Focus on the large shape of the hair instead of drawing every strand. Exaggerate the volume, curl pattern, hairline, or direction when those elements are distinctive.
Keep accessories clear and simple so they strengthen the portrait without covering the face.
Step 10: Refine the Drawing
Once the exaggeration and likeness feel balanced, create cleaner lines over the rough sketch. Simplify unnecessary details and strengthen the most important shapes.
Use thicker lines around the outer head, hair, and body. Use thinner lines for eyes, wrinkles, teeth, and small facial details.
Step back regularly and compare the drawing with the original photograph.
Step 11: Add Color and Shading
Apply skin tone, hair color, clothing, and accessories. Keep the color areas clean and easy to read.
Add simple shadows under the hair, eyebrows, nose, chin, and clothing folds. Highlights in the eyes and hair can make the portrait feel more lively.
Caricatures usually benefit from simple, bold color rather than overly realistic rendering.
Step 12: Check the Likeness Before Finishing
Ask yourself whether the person would be recognizable without the clothing or background. If not, review the head shape, expression, and spacing of the main features.
You may need to reduce one exaggeration, strengthen another, or correct the relationship between the eyes, nose, and mouth.
What Should You Exaggerate?
The best feature to exaggerate is not always the largest one. It is the feature that contributes most strongly to the subject’s identity.
| Observation | Possible Exaggeration |
|---|---|
| Wide, cheerful smile | Increase the width, raise the cheeks, and emphasize dimples |
| Long, narrow face | Stretch the head shape and reduce the width |
| Large, expressive eyes | Enlarge the eyes while simplifying nearby features |
| Strong jaw and small forehead | Widen the lower face and reduce the upper face |
| Curly or tall hairstyle | Increase the volume and simplify the curls into bold shapes |
| Distinctive glasses | Enlarge or strengthen the frames while preserving their shape |
| Raised eyebrow or uneven smile | Emphasize the natural asymmetry |
Why Exaggerating Everything Can Ruin the Likeness
Beginners often believe a caricature must distort every part of the face. This usually creates visual confusion.
When the eyes, nose, mouth, ears, chin, and hair are all enlarged, no single feature remains dominant. The face may become funny, but it may no longer resemble the subject.
Selective exaggeration is more effective. Choose two or three important features and allow the others to support them.
Use Asymmetry to Improve Recognition
Human faces are naturally asymmetrical. One eye may sit slightly higher, one eyebrow may curve differently, or one side of the mouth may rise more than the other.
These small irregularities can be very important to likeness. Do not automatically make both sides of the face identical.
Natural asymmetry often gives a caricature more personality and life.
Traditional vs. Digital Photo-to-Caricature Methods
Traditional Drawing
Traditional caricatures can be created with pencil, ink, markers, colored pencils, or paint. Drawing by hand helps artists develop observation skills and confident line work.
The artist must plan proportions carefully because major changes can be harder to correct after the drawing is inked or colored.
Digital Drawing
Digital tools make it easier to enlarge, shrink, move, rotate, or reshape features. Artists can use layers for the photograph, sketch, clean lines, color, shadows, and background.
Digital drawing is especially useful for custom commissions because colors, clothing, text, and background details can be revised more easily.
Both methods rely on the same artistic principles: observation, shape, proportion, expression, and selective exaggeration.
Automatic Caricature Filters vs. Custom Artwork
Automatic filters can quickly apply cartoon effects or distort parts of a face. They can be entertaining and useful for generating ideas.
However, automatic software may enlarge features randomly or apply the same effect to every person. It may not recognize which details are most important to the subject’s likeness.
Custom caricature artwork gives the artist control over expression, exaggeration, personality, clothing, hobbies, and background elements.
How to Make the Caricature Flattering
A caricature does not have to be harsh. Many personalized portraits are designed to be cheerful, affectionate, and flattering.
To create a friendly caricature:
- Emphasize the smile and positive expression
- Use bright, inviting colors
- Avoid exaggerating sensitive features too aggressively
- Include favorite clothing, hobbies, or pets
- Use a confident or playful pose
- Keep wrinkles and skin texture simple
The level of exaggeration should match the purpose of the artwork and the personality of the subject.
Common Photo-to-Caricature Mistakes
Using a Poor Reference Photo
A dark, blurry, heavily filtered, or extreme-angle image can hide important facial information.
Starting With Small Details
Drawing eyelashes, teeth, wrinkles, or hair strands before establishing the head shape can lead to weak proportions.
Ignoring the Expression
A technically accurate face may still feel unlike the person if the natural smile, eyebrow position, or head tilt is missing.
Making the Face Too Symmetrical
Perfect symmetry can remove the small irregularities that make the subject recognizable.
Depending Entirely on a Filter
Automatic effects may create a cartoon appearance, but they do not always preserve personality or meaningful likeness.
Adding Too Many Background Details
A crowded setting can distract viewers from the face. Keep the composition focused on the subject.
A Simple Practice Exercise
Choose one clear portrait photograph and create three quick sketches.
- In the first sketch, exaggerate only the head shape.
- In the second sketch, exaggerate the strongest facial feature.
- In the third sketch, combine the strongest parts of the first two versions.
Compare all three drawings with the photograph. Decide which version is most recognizable and why.
Ideas for Personalized Caricatures From Photos
Once the face is recognizable, you can add a small body, meaningful props, and a personalized setting.
- A wedding couple in formal clothing
- A family with their pets
- A musician performing on stage
- A golfer celebrating a successful shot
- A gardener surrounded by flowers
- A graduate holding a diploma
- A retiree enjoying a favorite hobby
- A business owner standing beside a company sign
- A traveler visiting a favorite destination
- A birthday portrait with decorations and gifts
These personal details transform a simple face study into a memorable gift or keepsake.
Frequently Asked Questions
What makes a caricature look like the person?
A caricature preserves the subject’s head shape, facial spacing, expression, and distinctive features, even when certain proportions are enlarged or reduced.
Which feature should I exaggerate first?
Begin with the feature that catches your attention first. This may be the smile, nose, eyes, cheeks, chin, eyebrows, glasses, or hairstyle.
How much should I exaggerate?
Start with a subtle change and compare the drawing with the photograph. Increase the exaggeration gradually while checking that the person remains recognizable.
Can beginners make caricatures from photographs?
Yes. Beginners can use simple shapes, facial guidelines, and one or two controlled exaggerations to create recognizable results.
Is digital drawing easier than drawing by hand?
Digital tools make revisions easier because artists can resize, move, undo, and separate features into layers. Traditional drawing is valuable for learning observation and line control.
Can a caricature be realistic?
Yes. Some caricatures use realistic shading, textures, and color while still exaggerating the proportions of the face.
Should I trace the photograph?
Tracing can help study placement, but copying the photograph exactly will not create much exaggeration. Use the reference to understand the face, then rebuild it with simplified and exaggerated shapes.
Final Thoughts
Learning how to turn a photo into a caricature requires more than distortion. The artist must understand which shapes, expressions, and proportions make the person unique.
Begin with a clear photograph, study the overall head shape, identify the strongest features, and exaggerate them gradually. Preserve important spacing, include natural asymmetry, and capture the person’s familiar expression.
With regular practice, you can create caricatures that are funny, expressive, and unmistakably recognizable.
Caricature Related Articles
- 20 Caricature Artist Tips for Capturing Personality
- Best Digital Caricature Software for Funny Portraits
- Biggest Caricature Drawing Mistakes Beginners Make
- Caricature vs. Cartoon: What’s the Difference?
- Fun Caricature Ideas for Families, Weddings and Gifts
- History of Caricature Art: From Early Sketches to Digital Portraits
- How AI Is Changing Caricature Art and Digital Portraits
- How to Draw a Caricature: Beginner Step-by-Step Guide
- How to Make Money Drawing Caricatures Online and at Events
- How to Turn a Photo Into a Caricature and Keep the Likeness